Sunday, April 8, 2012

The 5 Day Turkey, Berry & Yogurt Diet

If you’re like me, and every other woman on the face of this earth, you get a bit squeamish as swim suit season approaches. I don’t know about you guys, but, for me, trying on swim suits is one of the most horrifying experiences, ever!

Well, I certainly don’t have all the answers to make swim suit season more enjoyable, but I definitely have a way to help you shed a few pounds while promoting healthier eating habits for the future: The 5 Day Turkey, Berry & Yogurt Diet.

Sounds delicious right?! Yeah, it actually is! I mean, I’d be lying if I said I wasn’t ready to head to the nearest forest to punch every turkey square in the face around day 3, but it worked like a charm, and the results are long lasting.

The Rules
Here’s what you do: for five days, all you’re eating is turkey, berries and yogurt. Now, there are some modifications allowed. For example, I added low fat, organic granola to my yogurt, and added spinach leaves and sun dried tomatoes to my turkey. This just made it less blah and made me feel like I was actually eating normal meals.

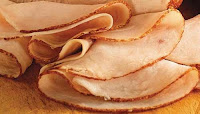
There are requirements about the turkey that MUST be followed in order for this to work. Your turkey has to be low fat (the lowest possible) and very low sodium. I’d highly recommend getting turkey that is cut fresh at the deli, rather than pre-packaged turkey in the lunch meat section; you’re going to have a lot more to choose from the deli, and they allow you to sample before you buy :)

As far as the berries go, there are no rules. Go crazy here! I used blackberries, but I think the next time I do it, I’ll add a medley of blueberries, blackberries and raspberries. For the yogurt, I used Yoplait LightVanilla Yogurt. As an added treat, I decided to combine the yogurt, berries and granola and eat them together as a parfait.

 How it Works
You’re probably wondering how this works, right? Well, all three of these ingredients provide your body with everything it needs, and nothing it doesn’t. Basically, you’re living on basic essentials, thus ridding your body of built up junk. Be sure to drink lots of water during this diet, as it will assist you in releasing toxins.

Also, I didn’t mention this earlier, but water is all you’re allowed to drink. No coffee, no diet soda and no juice… I know, I know… the thought of going without coffee is enough to drive me crazy too. But, just keep in mind the end results, and I promise, it’ll be totally worth it.

The Results
During this five day diet, I lost five pounds; which was so great, but that’s not even close to being the best part! The best part about this diet is the lasting results. By tricking your body into surviving on only the essentials for five days, you’re shrinking your stomach. This makes you feel fuller, quicker and puts a stop to overeating and binges.

Before starting this diet, I was eating around 1700 calories a day in order to feel full and satisfied. Since finishing the diet, I feel full after consuming only 1300 calories per day; that’s 400 calories a day, people!

I did this diet a couple weeks ago, and was waiting to blog about it so that I could get a real feel for the long term results. I can safely say that I am amazed by the results of this diet; it’s so great! I plan to do this diet once every 6-8 weeks to keep my body healthy, cleansed and satisfied.

Happy Swim Suit Season!


Follow Me on Pinterest

Sunday, April 1, 2012

Strawberry Shortcake Cupcakes


If you’re like most people, you have a serious sweet tooth and a need to fuel those sugar cravings. Lucky enough for me, I’m not much of a sweets fan; I will, however, double fist a bowl of pasta like nobody’s business.


For those of you who have a hard time sticking to a healthy diet when it comes to sugary snacks and sweets, I have some excellent news for you: I’ve created a 45 calorie cupcake that tastes like your favorite 1,000 calorie cupcake indulgences. It’s called the strawberry shortcake cupcake, and it’s simply divine.

Even for me, an anti-sweets connoisseur, I found pleasure in these delicious little cakes. I made them today for Daniel’s family birthday party, and had no leftovers. Furthermore, when I shared the news that each cupcake clocked in at around 45 calories, people were shocked.

Ready to try this recipe out for yourself? I’m sure you are! Here’s a detailed, step-by-step guide, with pictures, courtesy of Daniel (thanks, babe)!

Here’s what you’ll need:
  1. Preheat your oven to 375 degrees
  2. Prepare the Angel Food Cake according to the package instructions
  3. Pour the mixed Angel Food Cake batter into a one gallon Ziploc bag, and seal tightly.
  4. Snip a small cut in the bottom corner of the bag, and distribute the batter into cupcake liners in a cupcake pan. Fill each liner about ¾ of the way full. Putting the batter into a Ziploc bag is my personal preference, because it makes it extremely easy to add the batter, and makes cleanup a snap.
  5. After you’ve filled each cupcake liner, add five chocolate chips to the middle of each cupcake and push them down so that they are no longer visible.
  6. Put them on the second rack of your oven, and bake for 13 minutes, or until golden.
  7. While your cupcakes are baking, start slicing those strawberries! I sliced mine into fours (first halve each strawberry, then halve those halves… if that makes sense)? Anyway, the strawberries just need to be small enough to fit onto the top of your cupcakes. But, we will get to that step in a minute.
  8. Once your cupcakes have finished baking, take them out and put them on a cooling rack for about 30 minutes (or until cool). Remember, you’ll be using Cool Whip as your frosting, so you’ll want to make sure they are completely cool, or else you’ll have a giant, runny mess on your hands (and countertop).
  9. Once your cupcakes are completely cooled, now it’s time to top them with Cool Whip. To complete this step, distribute your entire container of Cool Whip into another one gallon Ziploc bag, and snip a small cut on the bottom corner.
  10. Then, squeeze the Cool Whip onto each cupcake in a circular pattern, making sure to cover the entire surface, and build up a little peak so that the strawberries look adorable when they are placed on top.
  11. After you’ve added the Cool Whip, you can top them with chocolate sprinkles. Not only does this look super cute, but the sprinkles complement the surprise chocolate chips that are warm and melty inside.
  12. Finally, top with 2-3 slices of strawberry by pushing them down into the center of the icing and cake.
  13. Stuff your face!
This recipe is easy, quick and so good it's just ridiculous. Check out the pictures below for some more guided instructions!


Adding the batter into the cupcake liners. Please ignore my hideously dirty kitchen. Cupcake baking isn't a clean job ;)


Adding the chocolate chips! Just make sure to push them down so that they are completely covered by the batter!
After baking, this is what they should look like. I got it right the first time; I couldn't believe it! I have a tendency to pop things in the oven and totally forget about them. Not this time :)

Here's step one of the icing process. Just start on the outer edge, and work your way in; piece of cake! No pun intended ;)

And, here's how the icing should look after you've finished! Of course, you can add more or less to taste, but Cool Whip is delicious... There was no chance of me scrimping in that department.
After you've iced them to your liking, you'll coat them with some chocolate sprinkles, and add your strawberries. The final product looks like this, and they taste even better! Don't worry, I didn't forget about adding the strawberries to the one in the back; it was made special to accommodate a strawberry allergy.

Find more healthy, and delicious recipes on my Nutrish & Delish Pintrest board, here. I’m a total spaz when it comes to pinning healthy recipes; I just can't stop! You’re sure to find something that you’ll love on my boards!

Also, if you find a recipe that is totally unhealthy that you want to make healthy, just let me know! I have a knack for turning unhealthy foods into healthy foods, by just swapping out a few ingredients.

Stick with me, I’ll show you all the best ways to get fit, while still eating like it’s your job :)


Follow Me on Pinterest
Related Posts Plugin for WordPress, Blogger...